22 June 2006
Component Storage Ideas
| P/N | Dia. | Height | Price
|
| 4332T31 | 1-1/2" | 1/2" | $6.92(12)
|
| 4332T21 | 2-3/8" | 3/4" | $6.96(12)
|
| 4332T23 | 4" | 1-1/8" | $7.85(6)
|
For parts storage I built some trays that hold tin-plated steel cans
available from
McMaster Carr.
I chose shallow storage cans so that
parts could be easily removed from the containers with tweezers. I
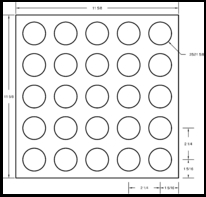
chose a tray size of 12-3/8" x 12-3/4" which allows a reasonable
amount of cans and does not take up too much space on the workbench.
The 1-1/2" diameter can is good for resistors and capacitors, the
2-3/8" can for ICs and semiconductors and the 4"
can for inductors, connectors and crytals.
Tray Construction
The main part of the tray, the plywood assembly, is built by fastening
a plywood square with through-holes to the top of a plywood square
without holes. Oak trim is attached to three sides of the plywood
assembly and an oak front to the fourth.
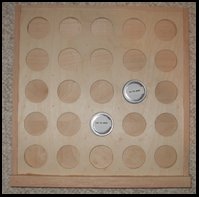
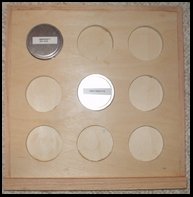
The tray for the 1-1/2" diameter tins holds 25. The tray for the
2-3/8" diameter cans holds 9. The tray is constructed out of two
pieces of plywood and some oak trim. I used scrap plywood
(Baltic~Birch) for the base. The trim is leftover sapwood from the oak
tree that was in my backyard.
Building Trays for 1 1/2" diameter cans
- From sheets of 1/2" and 1/4" plywood rip an equal number of 11-5/8" squares.
- Tape the 1/4" squares together in a stack so that all of the
squares can be drilled at the same time.
- Drill the holes as specified in the fabrication drawing.
- Glue and brad nail each 1/4" square to a 1/2" square.
- Sand the edges of the plywood assembly to 120grit and remove the dust.
- Glue oak trim to three of the edges of the plywood assembly. I
used 3/4" wide by 3/8" thick strips of oak.
- Glue an oak front to the uncovered edge of the plywood assembly.
I used a 1" wide by 3/4" thick strip of oak.
- Sand the assembly, remove the dust and seal with Polyurethane.
| 
|
| Finished Tray
| Fabrication Drawing
|
Building Trays for 2 3/8" diameter cans
- From sheets of 1/2" and 1/4" plywood rip an equal number of 11-5/8" squares.
- Tape the 1/2" squares together in a stack so that all of the
squares can be drilled at the same time.
- Drill the holes as specified in the fabrication drawing.
- Glue and brad nail each 1/2" square to a 1/4" square.
- Sand the edges of the plywood assembly to 120grit and remove the dust.
- Glue oak trim to three of the edges of the plywood assembly. I
used 3/4" wide by 3/8" thick strips of oak.
- Glue an oak front to the uncovered edge of the plywood assembly.
I used a 1" wide by 3/4" thick strip of oak.
- Sand the assembly, remove the dust and seal with Polyurethane.
| 
|
| Finished Tray
| Fabrication Drawing
|
Watchmaker's Cases
Watchmaker's cases are available from
Lee Valley
.
The cases are glass-topped aluminum cans. I use the larger
sizes for storage of inductors, crystals and connectors. I found the
33mm diameter lid to be difficult to remove but the 53mm diameter
worked fine.
Specifications and pricing are available
here
Toolbox Trays
Also available from
Lee Valley
. are
these stamped steel trays that are designed to slide into a slot made
from the kerf of a standard tablesaw blade. The trays come in heights
of 1", 2" and 3" with prices between $7-$9.
Specifications and pricing are available
here


